You register for an E-ZPass PA account online in ten short steps, starting with the Terms & Conditions and ending with E-ZPass Plus.
Open the E-ZPass application at paturnpike.com, accept the Terms & Conditions, then set your PIN, username, and password. Enter your contact details, verify your phone and email, and add your vehicles and transponders. Choose replenishment, enter payment, and confirm E-ZPass Plus. Transponders arrive in 7 to 10 business days.
The Pennsylvania Turnpike Commission runs the application. The whole form takes under 15 minutes with your documents ready. You need a driver’s license, license plate number, email, phone, and a payment card.
This guide walks you through all ten steps in order. Each step below lists the exact fields to complete and the rules that trip up first-time applicants.
Before You Start
Gather five things so you finish in one sitting.
- Driver’s license and its issuing state.
- License plate number for each vehicle.
- Email address you can check right away.
- Phone with call blocking turned off.
- Credit card or bank details for payment.
Start at paturnpike.com and open a personal E-ZPass account. A personal account holds up to 9 transponders and vehicles of 15,000 pounds or less.
Step 1: Read and Accept the Terms & Conditions
The application opens on the Terms & Conditions. Read them before you check the box.
- The agreement sets the deposit, fees, and refund rules.
- Your first use of the transponder accepts the full agreement.
- The account is private and non-commercial.
Check the “I Agree” box to continue. You cannot move forward until you accept.
Step 2: Set Up Online Access (Web Security)
This step creates your login and phone-verification PIN. Choose values you can remember but others cannot guess.
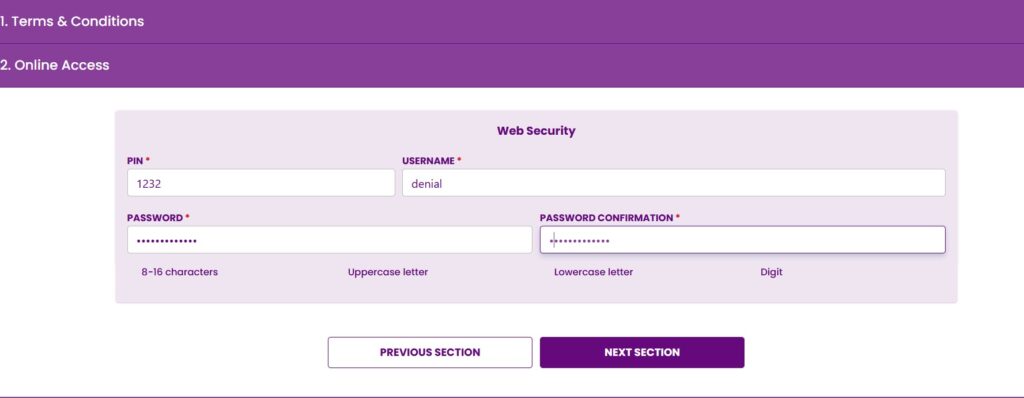
- PIN. Pick a 4-digit code. The service center uses it to verify you by phone.
- Username. Choose a unique username for the login portal.
- Password. Use 8 to 16 characters. Include an uppercase letter, a lowercase letter, and a digit.
- Password confirmation. Type the same password again to confirm it.
Avoid simple PINs like 1234 or repeated digits. A strong PIN and password protect your balance and card.
Step 3: Enter Your Contact Details
This step collects your name, address, phone, and email. The center shares account details only with contacts listed here.
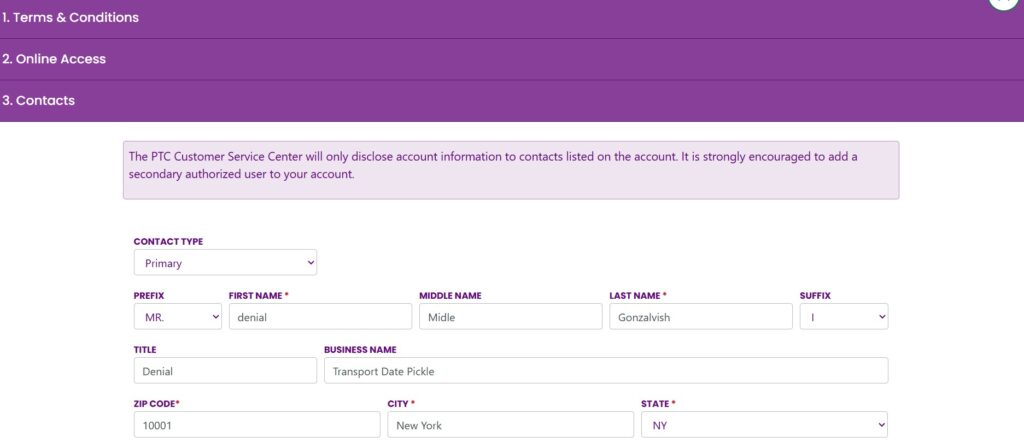
Complete your personal fields first.
- Contact type: Primary or Secondary.
- Name: first and last are required; prefix, middle, suffix, and title are optional.
- Address: street, city, state, and ZIP, then confirm the address.
Add a secondary authorized user if you can. That lets a spouse or coworker manage the account with you.
Next, verify at least one phone number.
- Turn off call blocking on your phone, or the code will not arrive.
- Enter your phone number and pick SMS or Voice.
- Click “Send Code,” then enter the code you receive.
- Click Submit to verify. Standard text and call charges may apply.
Then verify your email address.
- Enter and confirm your email.
- Watch for a message from [email protected] with the subject “Email Verification Required.”
- Check your spam folder if it does not arrive.
- Click the link to verify. The center cannot email account notices until you do.
Finish this step with your driver’s license number and its issuing state.
Step 4: Choose Your Account Notifications
This step sets how the center reaches you. Notifications warn you about low balances, tolls, and account changes.
- Turn on email alerts, text alerts, or both.
- Email alerts need the verified email from Step 3.
- Low-balance alerts help you avoid violations.
Pick alerts for tolls and payments too. Early warnings keep your account funded.
Step 5: Set Your Statement Delivery
This step picks how you get statements. Your choice affects your fees.
- Online statements are free. View them in your account or the PA Toll Pay app.
- Paper statements carry a monthly fee.
Choose online delivery to skip the charge. You still get every statement, just on screen.
Step 6: Add Your Vehicles
This step lists the vehicles that use your tags. Accurate details keep your tolls on the right account.
- Enter the license plate number and state for each vehicle.
- Add the make and model.
- List each vehicle that may use a transponder.
Two limits apply to a personal account.
- Each transponder covers up to 4 vehicles.
- Register more than 4 vehicles and you add another transponder.
Step 7: Add Your Transponders
This step sets how many tags you order. Order one per regular vehicle for the best reads.
- A personal account holds up to 9 transponders.
- Each transponder carries a one-time $10 deposit.
- Each transponder also carries a $3 non-refundable annual fee.
- The $10 deposit is waived when you choose automatic replenishment.
Order 10 or more transponders and you need a commercial account instead.
Step 8: Choose Your Replenishment
This step decides how your balance refills. Two methods exist, with different triggers.
Automatic replenishment (credit card or ACH):
- The system charges at least $35 per transponder when your balance falls to $10 per transponder.
- Credit cards allow 2 automatic reloads a month; ACH allows 3.
- Cross that cap and you raise your reload amount, or the account risks extra fees.
Manual replenishment (cash, check, or credit card):
- You add at least $35 per transponder when your balance falls to $15 per transponder.
- Pay by mailing a check, visiting the service center, or authorizing a one-time card payment.
Automatic replenishment waives your deposit and prevents most low-balance violations.
Step 9: Enter Your Payment Information
This step links the card or bank account that funds your tolls. It covers your first payment and future reloads.
- Enter your credit card, debit card, or bank (ACH) details.
- The system uses this method for automatic reloads.
- Add a secondary credit card if you plan to use E-ZPass Plus.
Update this method any time your card expires. An expired card leads to failed reloads and violations.
Step 10: Confirm E-ZPass Plus
This step handles airport and lot parking with your tag. It is the last part of the application.
- Accounts with a prepaid balance and a credit card enroll automatically.
- E-ZPass Plus pays for parking at select airports and lots.
- Opt out later through your account, the PA Toll Pay app, or by phone.
Submit the application after this step. Your registration is complete.
After You Submit
A few things happen once you finish. Watch for them so your tag works on time.
- Verify your contacts. Confirm the email and phone if you have not already.
- Wait for delivery. Transponders arrive by mail in 7 to 10 business days.
- Mount each tag. Place it behind the rearview mirror, near the top center.
- Confirm activation. Your tag works within 24 hours on the PA Turnpike and 48 hours out of state.
Registration at a Glance
Confirm current figures on paturnpike.com, since the Commission can change terms with notice.
| Step | What you set | Key detail |
|---|---|---|
| 1 | Terms & Conditions | Accept to continue |
| 2 | Web security | Password: 8–16 chars, upper, lower, digit |
| 3 | Contact details | Verify one phone and your email |
| 4 | Notifications | Email needs a verified address |
| 5 | Statement delivery | Paper costs a monthly fee |
| 6 | Vehicles | 4 vehicles per transponder |
| 7 | Transponders | $10 deposit + $3 annual fee per tag |
| 8 | Replenishment | Auto reloads $35 at a $10 balance |
| 9 | Payment | Card or bank for reloads |
| 10 | E-ZPass Plus | Auto-enroll with prepaid + credit card |
Frequently Asked Questions
How long does E-ZPass PA registration take?
The online application takes under 15 minutes with your documents ready. Transponders arrive in 7 to 10 business days.
What are the password rules?
Use 8 to 16 characters. Include one uppercase letter, one lowercase letter, and one digit.
Why won’t my phone verification code arrive?
Call blocking stops the code. Turn it off, then click “Send Code” again.
I didn’t get the verification email. What now?
Check your spam folder for a message from [email protected]. Click the link inside to verify your address.
Can I add another person to my account?
Yes. Add a secondary authorized user in Step 3. The center shares account details only with listed contacts.
Do I need a transponder for every vehicle?
Each transponder covers up to 4 vehicles. Order a separate tag for vehicles you drive at the same time.
Where do I log in after registration?
Sign in at paturnpike.com/e-zpass or in the PA Toll Pay app. See our E-ZPass PA Login guide for step-by-step help.
The Bottom Line
Registering for E-ZPass PA takes ten steps and under 15 minutes. Accept the terms, set a strong PIN and password, and verify your phone and email. Add your vehicles and transponders, pick automatic replenishment, and confirm E-ZPass Plus.
Choose automatic reloads to waive the $10 deposit and dodge violations. Read the full E-ZPass Agreement on paturnpike.com before you submit. Your tag works within 24 hours once you mount and activate it.